Tirggel are very thin, very hard, lightly spiced honey biscuits with a slightly raised image on top typically associated with Canton Zürich in Switzerland. Production and sales ramp up when the cold weather arrives with sales peaking around Christmas and spiking again during the annual guild parade Sechseläuten (or Sächsilüüte). They have variously been called Tirggel, Türggeli and Dirggeli. One likely name derivation theory is Tirggel was named for the dialect word torggeln which means stirring a thick, viscous dough. To hear the Tirggel radio show I did in Switzerland, please go to this link.
 The first written record of Tirggel is found in 1461 witch trial court documents. The alleged witch had been treating a very ill boy. As part of the treatment, she fed him a little-known spiced, honey biscuit (then called Dirggely or Dirggeli). The boy died and she was found quilty of killing him using witchcraft via this mysterious Dirrgeli and, soon thereafter, executed. The trial sparked interest in this, until then, largely unknown and now famous (and infamous) Dirggeli. Incredibly, people clamored to get a taste.
In the 15th and 16th centuries, the difficult-to-obtain ingredients made Dirggeli a luxury item few could afford. Even as ingredients became more easily obtainable, they were still a bit of a rarity since, before 1840, only town bakers had the rights to bake this item. After that, all bakers were granted production rights so Tirggel became more common.
Historically, Tirggel were made by pressing a very stiff, thinly-rolled honey, spice, rosewater and flour dough into hand-carved wooden molds. Very few places now make Tirggel (the largest and best known being Honegger and Suter). The images are always intricate and detailed, often with lettering in addition to the pictures. So, even with mass production where images are pressed onto the dough using a large roller, it still might require using fingers to further press the dough into the tiny crevices. Here is a link to photographs of this process at Honegger
Tirggel were originally a type of communication platform. Romantic images were common. (Much easier to hide the evidence from your parents back then by just eating it). Biblical and historical stories could be told to those who could not read. I was beyond ecstatic when I came across the four wooden molds pictured below recounting the brave deeds of Swiss hero – Wilhelm Tell at a Brocki (second hand shop) for a mere 8 CHF each.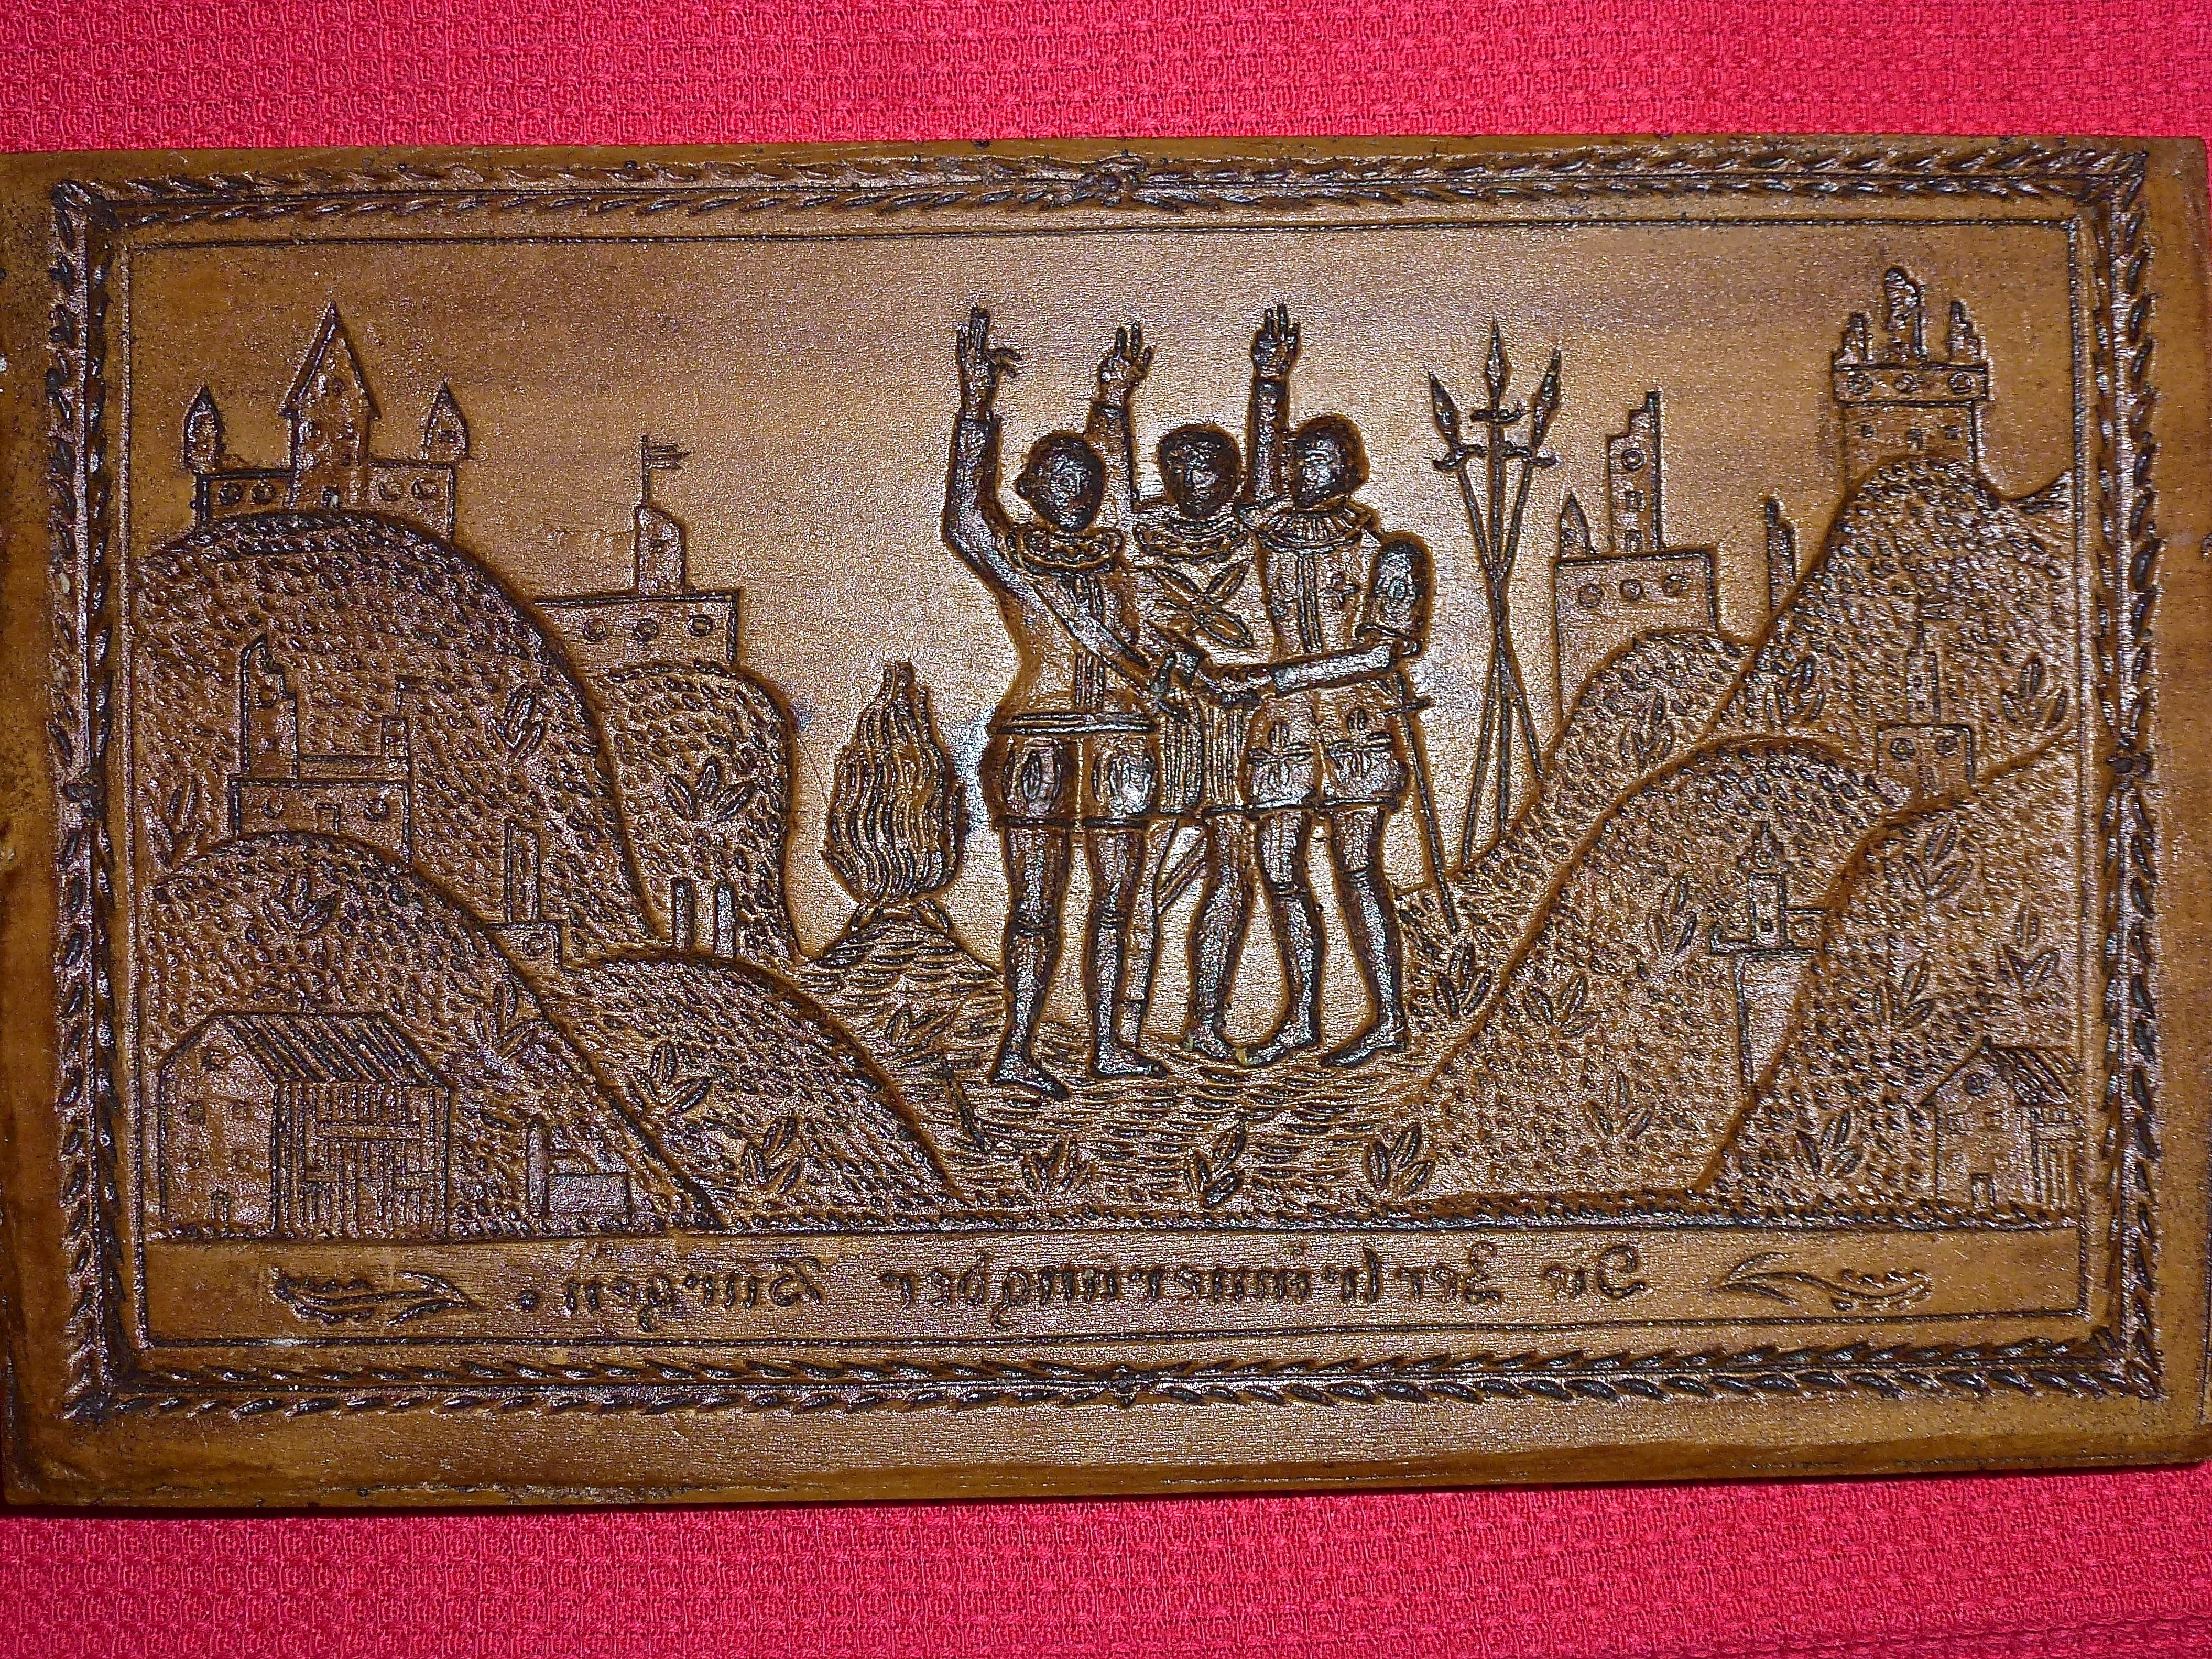


Trades or guild occupations were also (and still remain) popular subjects. My Swiss friend’s father is a guild member and marches every year in the Zürich Sechseläuten parade. Some of the craft associations throw specially-made Tirggel with their guild symbol stamped on it. I found this mold depicting such crafts at another Brocki for a ridiculously cheap price.

Wealthy families and local governments would also have their coats of arms impressed onto Tirggel and give them out at dinners or as gifts. New construction projects (for example train stations and universities) as well as technical novelties (such as the first steam ship on Lake Zürich) became popular commemorative images. You can find all sorts of images now but most remain traditional.
Honegger Tirggel bakery shared their Tirggel recipe, which I translated, modified and adapted at the bottom of the post in printable form. Begin by gathering and weighing out flour, confectioners’ sugar (also known as powdered or icing sugar), honey, cinnamon, cloves, ginger, coriander, anise and rose water. Amounts are in grams and ounces. I also converted the recipe using measuring cups but this is much less accurate and may result in a flattened image.

Place the honey, spices, sugar and rose water in a pan.

Stir the mixture to blend.

Cook over medium heat, stirring often.

When the sugar has liquified, remove from the heat and let sit until it reaches room temperature.

Place the flour in a large bowl.

Pour cooled honey, sugar and spice mixture over the flour.


Stir to combine with a wooden spoon.

The dough will be very crumbly. If it does not come together, dump it out onto a work surface and knead. Use a bench scraper to gather up stray bits.


Knead until somewhat smooth.

The dough will be crumbly but it should hold together. If the dough is too moist, the picture will melt during the very brief baking process (described below). If it will not even remotely come together, drizzle a bit more honey or water over the mass and knead until combined.

Wrap in plastic and let rest at room temperature for a minimum of 8 hours.

It is very important to let the dough rest at least 8 hours. Below is a picture of Tirggel made one hour after the dough was mixed (left) and after the dough rested 8 hours (right).

To be on the safe side, bake a small, test Tirggel to see if the dough has been rested long enough using the mold preparation and baking method described below. Here is a close-up shot of a test cookie baked 8 hours after letting the dough rest. The imprint of a miller and his mill stone held its shape so I deemed it OK to commence baking.

Now it is time to prepare the Tirggel mold. If you don’t have a mold, the dough can simply be rolled thin and cut with a knife or pastry cutter into squares or rectangles (or with cookie cutters into any shape friendly to crumbly dough such as circles or ovals).

Either dust every surface and crevice of the mold with flour.


Or, preferably, brush the mold with a nut or neutral-flavored oil. Be sure to coat the entire surface and every crevice.


Lightly dust a rolling surface and a rolling pin with flour. Begin rolling in every direction. Keep in mind the final thickness of the dough should be about 2.5 mm thick. This is about the thickness of a quarter, a 2 Swiss franc coin or a 2 Euro coin.

There are several methods of making the impression. I prefer to roll the dough to a thickness of 3 to 4 mm. Be sure the rolled out piece is roughly the size of the wooden mold or larger.
With the impression side of the mold face-up, lay the dough on top. Roll and press the dough to cover the surface of the mold and into the crevices.


If the mold is not huge, carefully flip the mold so it is dough-side down on a floured surface. Using a bench scraper, knife or pastry cutter, slice off excess dough from around the edges and save to make the next batch or Tirggel. If the mold is large, do this directly on the pan.
Alternately, if not making an impression of the entire mold, place the rolled dough over the impression desired, Roll and press into the crevices then carefully cut around the section being used, taking care to not damage the mold).

Lightly grease a baking sheet. DO NOT use parchment or any type of baking paper as it will catch on fire. Also, do not use your best baking sheets for this project as they might char. Turn the mold dough-side down and gently whack the corner of the mold onto a hard surface. Carefully peel the dough off the mold directly onto the prepared pan. If the mold is properly prepped, the impressed dough will drop off.
Now comes the tricky bit. Professional baking techniques are impossible to replicate at home. Ovens are heated to a searing 350° Celsius (660° Fahrenheit) then the Tirggel are baked for only 90 to 100 seconds. The only way I discovered to bake these in my home kitchen is to set the oven to broil (over-bake) and crank it up to the highest possible temperature. Place the rack on the uppermost level. Once the oven has pre-heated, pop in baking sheet, close the oven door and watch it like a hawk.

After one minute, turn the pan. After another minute, pull it out to see if it has reached a golden brown color. If not, pop back in a a few more seconds. Continue checking every 5 or 10 seconds. I finish them off when they are on the verge of being completely done by keeping the oven door open, grabbing one end of the pan and sliding it in and out and in and out of the oven until the desired color is reached. Let the cookie cool a bit on the pan before trying to move it to a cooling rack. Ideally the finished Tirggel will be golden on top and whitish on the bottom.

This one below was left in a mere 10 seconds too long and already began to char.

Here are a few pictures from this batch. I absolutely love the rustic charm and spiced honey taste of the historic Tirggel.


- 450 grams honey (11 fluid ounces / 1⅓ cups)
- 100 grams (3.5 ounces / ⅘th cup) confectioners' (icing) sugar
- 1 teaspoon ground cinnamon
- 1 teaspoon ground cloves
- 1 teaspoon ground ginger
- 1 teaspoon ground coriander
- 1 teaspoon ground anise
- 1½ tablespoons rosewater
- 700 grams (25 ounces / 5 3/5ths cup) all-purpose flour
- Place the honey, spices, sugar and rose water in a pan.
- Stir the mixture to blend.
- Cook over medium heat, stirring often, until the sugar has liquified.
- Remove the pan from the heat and let sit until the mixture reaches room temperature.
- Place the flour in a large bowl.
- Pour the cooled liquid over the flour.
- Stir with a wooden spoon until the dough begins to come together.
- It may be necessary to dump the dough out onto a work surface and knead in the remaining flour.
- If it still refuses to come together, drizzle a bit of honey or water over the dough and knead until distributed.
- The dough will be a bit crumbly and very, very stiff.
- Wrap tightly in plastic wrap.
- Set aside to let the dough rest at room temperature at least 8 hours.
- Oil (preferable) or flour-dust a Tirggel mold.
- Lightly dust a rolling surface and a rolling pin with flour.
- Begin rolling in every direction.
- (Keep in mind the final thickness of the dough should be about 2.5 mm thick, about the thickness of a quarter, a 2 Swiss franc coin or a 2 Euro coin.)
- Roll the dough to a thickness of 3 to 4 mm.
- (Be sure it is roughly the size of the wooden mold or larger.)
- With the impression side of the mold face-up, lay the dough on top.
- Roll and press the dough to cover the surface of the mold and into the crevices.
- Carefully flip the mold so it is dough-side down on a floured surface.
- Using a bench scraper, knife or pastry cutter, slice off excess dough from around the edges and save to make the next batch or Tirggel.
- If the mold is large, do this directly on the pan.
- Alternately, if not making an impression of the entire mold, place the rolled dough over the impression desired, Roll and press into the crevices then carefully cut around the section being used, taking care to not damage the mold).
- Lightly grease a baking sheet. DO NOT use parchment or any type of baking paper as it will catch on fire.
- Turn the mold dough-side down and gently whack the corner of the mold onto a hard surface.
- Carefully peel the dough off the mold directly onto the prepared pan.
- Pre-heat the oven on broil (over-bake) on the highest possible temperature.
- Place the rack on the uppermost level.
- Put the baking sheet in the oven and close the door.
- After one minute, turn the pan.
- After another minute, pull it out to see if it has reached a golden brown color.
- If not, pop back in a a few more seconds.
- Continue checking every 5 or 10 seconds.
- When Tirggel are on the verge of being completely done, open the oven door and continuously slide the pan in and out until the desired color is reached.
- Let the Tirggel cool a bit on the pan before trying to move it to a cooling rack.
- Ideally the finished Tirggel will be golden on top and whitish on the bottom.


I truly love your website.. Great colors & theme.
Did you build this site yourself? Please reply back as I’m wanting to create my own site and would like to find out where you got this from or what the theme is called. Thanks!
Thanks so much! If you look at the bottom right of my home page, you will see a link to the Shauna’s website. http://seemydesignsbyshauna.com/ She is fabulous,fast, reasonably priced and she exactly interpreted what I had envisioned for my site. I cannot say enough great things about her.
Thank you for the recipe, and especially the history and step-by-step photos. I have used various doughs for molded cookies (from http://www.houseonthehill.net) and tirggel is new to me – looking forward to trying it as it will bring a new and different flavor and dimension, especially for molds with more delicate and fine details. Great blog, too!
Thanks so much, Rose. There will be more cookie mold recipes to come. So many blog ideas and so little time! Just spent time in a kitchen of a traditional chef in Marrakech so may need to do some of those postings first. And I still have not done postings from my time woodcarving in Malta. Would love to hear more about what type of cookies you are making. I am still deciding if I prefer Springerle with or without butter and with anise seeds or only anise oil.
Thank you so much for your wonderful job in presenting the recipes in a cultural and historic setting. My mother was from Zurich and I got tears in my eyes just reading about the cookies! It stirred many good memories of her – preparing them for our family! I’m sure she will be sending you many blessings from heaven this Christmas…
One thing would make me happier: an email click key – to make it easy to share your site with my loved ones – by email
Hi Amy. These are beautiful cookies. Thanks so much for sharing the recipe! Do you (or any of your readers) know where to find such beautiful molds? (I know there are a few springerle mold vendors in North America, but I haven’t been able to find any tirrgl ones at all like yours.) Thanks again!
Sorry for the delayed response. I was out of the country in Myanmar with little to no internet access for 2 weeks. Tirggel molds are difficult to find. I found all of mine in second hand shops in Switzerland. Contact Patrice at Springerle Joy and ask her which molds would be best suited to this cookie. They must be quite shallow.
http://www.springerlejoy.com
I found your site thanks to a Google image search. I recently bought this very same mold in North Carolina at an antique shop. How it got here, I have no clue. I was trying to confirm my rusty German and learn more about the piece and am so happy to have found your article and recipe! Thank you for sharing.
Mine kept burning on the bottom so I put them in a pie pan on the cookie sheet and it seems to have done the trick. I may have erred on the side of underbaking. Also I initially made them too thick as I usually make springerli.
Am waiting for my test cookie to cool!
It is tricky baking these. Are you using a black or very dark pan? Those always cause issues with cookies and cakes. Hope yours turn out🇨🇭
It is black, i placed another beneath and it cut the heat enough and worked!
I was given a handmade mould some years ago by a Swiss friend. I thought that he said that it was for pastry (I assumed for a pie). I am very excited to now find your recipe for honey biscuits. In some of the photos, the biscuits are quite shiny, in others, less so. I’m tempted to add an egg wash to give them a sheen to emphasise the pattern. What are your thoughts?
A year late but just saw this. Yes, an egg wash is a great idea.
If some one needs expert view concerning running a blog afterward i advise him/her to
pay a quick visit this web site, Keep up the nice
work.